Tuesday, April 19, 2011

An Overview of Copic Markers

Copic Markers -- A Papercrafter's Dream!

What are Copic markers? Copic markers are a magnificent, alcohol-based marker used in many art forms. They were first designed over 25 years ago as a marker for Japanese artists who were into anime drawing. One of the best features of these markers are that they are green (environmentally friendly) -- you never throw away a spent marker, simply refill it!

Copic markers are blendable and have the ability to be used with an airbrush system to have them perform like an airbrush. By them being alcohol-based rather than water-based, you have the freedom to layer and blend color upon color without ruining the surface of your paper. They won't pill the paper like a water-based marker would. Also because of their alcohol base, they can be used on other surfaces (fabric, metal, glass, leather, word, plastic, etc.) as well -- they are waterproof and will not wash away. One concern that some have about these markers are their acid free properties. Because the dye is suspended in alcohol, as soon as the alcohol evaporates -- and this happens rapidly -- they become acid free. No worries here...

As long as the markers have their caps securely closed, they will not dry out. The manufacturers of these markers has guaranteed this for 3 years. The markers can be stored either horizontally or vertically without risk of damage or leaking. This makes them work well with your marker organization style because you can choose which way works best for you when storing them.

If you will be using your Copic markers with other media, it is always safest to use your Copic markers first and then layer the other media -- i.e., colored pencils or watercolors -- over the marker. This is to help ensure that you do not ruin your Copic marker with the other media. If you use the other media first, it is possible that their whatever makes it up can leach from the paper to the Copic marker tip. Once on the tip, it will continue leaching its way into the marker and contaminating the entire contents. Always use your Copics first.

Stay tuned for our next installment of Copic Basics, where we will take a look at safety tips and caring for your markers. We hope you enjoyed this brief overview of what Copic markers are.

Much love,
Dymonz...

Wednesday, April 13, 2011

Tag: Tim Holtz Acrylic Ink Resist

Designer: Stampin' Dymonz

Tools and Supplies
Tim Holtz Alterations Die - Tags & Bookplates
Tim Holtz Tiny Attacher
More Mustard SU! Classic Stampin' Pad
Pixie Pink SU! Classic Stampin' Pad
Brilliant Blue SU! Classic Stampin' Pad
Elegant Eggplant SU! Classic Stampin' Pad
Adirondack Metallics Acrylic Paint Dabber - Pearl
Tsukineko Black Ink Pad
Butterfly Stamp
Sentiment Stamp
Yellow Polka Dot Ribbon

1) Ink Butterfly Stamp thoroughly using acrylic paint dabber. Stamp image on tag. Allow paint to dry. 2) Using the sponging technique, sponge random parts of the butterfly. Bring sponged color all the way to edges of tag. 3) Wipe excess ink off of stamped image to reveal full clear image. 4) Stamp sentiment using black ink. 5) Using More Mustard, ink the edges of the tag. Add a piece of ribbon.

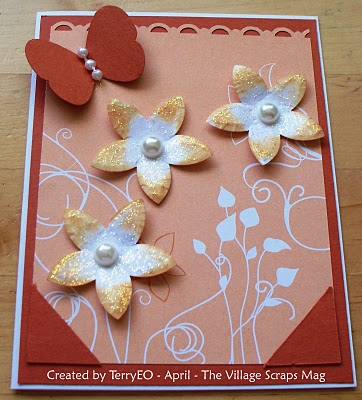
Stampin' Up! Butterfly Card

Designer: TerryO

Tools and Supplies
SU! Cardstock - Regals Collection
SU! Sunny Garden Designer Series Paper
SU! Butterfly Punch
SU! 5-Petal Flower XL Punch
Tim Holtz Distress Ink - Tea Dye
Studio G Pearls
Ranger Diamond Stickles
Border Punch

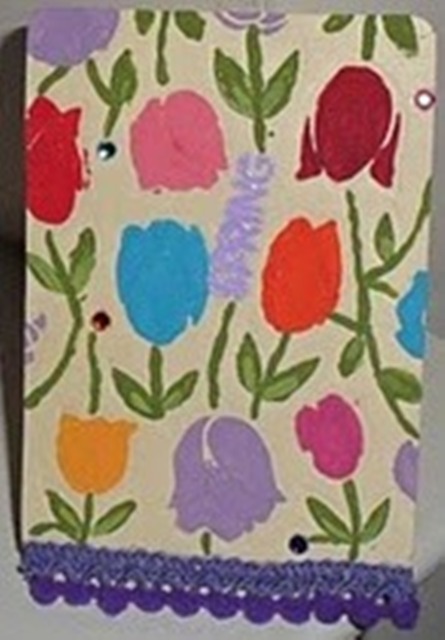
Technique Time: Stenciling on an ATC

Designer: Vernetta Marquis

Tools and Supplies
Spellbinders Impressabilities
Cardstock
Acrylic Paints
Embellishments
Pom Pom Ribbon
VersaMark Watermark Stampin' Pad
Heat Tool
Embossing Powder
"Spring" Sentiment Stamp


1) Cut cardstock to ATC (Artist Trading Card) size (3.5" x 2.5"). Emboss using the Impressabilities die. 2) Using the same die as a stencil, place it on top of the embossed ATC to line up with the embossed impressions. Paint each flower and stem. Remove stencil. Touch up paint as necessary once stencil has been moved out of the way. 3) Stamp the word "Spring" and heat emboss. 4) Add bling and embellish. Add pom pom ribbon to bottom edge of ATC.

Thursday, April 7, 2011

Easter Altered Item

Designer: Terry O

These are altered eggs. They had expired, so perfect to use. I punctured a small hole on each end and blew out the egg, rinsed thoroughly and started crafting.


This egg has ribbon flowers that you can buy in a pack of 50 at Michael's.


This egg was altered using these bows I bought somewhere. I added a few cute glittery butterflies.


This egg was decoupaged with regular paper and ink distressed with Sage and Tea Dye. I then added round beads to make grapes; added stickles to make it sparkle.

The baskets were made from this template on Split Coast Stampers. I did make changes to the handle.

Supplies used 
Large Grade A Eggs
Stampin' Up! Card Stock
K & Company patterned Paper
Wild Orchid Roses
Wild Orchid Felt Bows
Wild Orchid Sparkle Mini Butterflies
Martha Stewart Border Punches
Martha Stewart Leaf Punch
EK Success Butterfly Embossed Punch
Pizzazz Aplenty Crocheted Flowers
Michael's Beads
Ranger Diamond Stickles
Offray Pearl Ribbon Flowers
Tim Holtz's Distress Ink (Bundled Sage/Tea Dye)

12 x 12 Easter Layout

Designer: Stampin' Dymonz

Tools and Supplies
12 x 12 Lavender Cardstock
12 x 12 Decorative Paper
Several Sheets of Pastel Colored Cardstock to Make Eggs
MS Deco Fan Punch-Around-the-Page Punch Set
SU! VersaMark Watermark Ink Refill (102193)
Lavender Zing Embossing Powder
Heat Tool
Cricut Electronic Cutter
Designer's Calender Cricut Cartridge
My Community Cricut Cartridge
Green Fringe Fibers
Adhesive


1) Decorate edge of base cardstock using the MS punch. 2) Cut basket using Cricut and My Community Cartridge at about 10 inches. 3) Cut enough eggs from the Designer's Calendar cartridge at 2" in different colors to fill the basket. Cut 2 eggs at 4.5". 4) Following the cuts on the two 4.5" eggs, squeeze VersaMark ink. Cover ink lines with Zing Embossing Powder and heat. 5) Cut the word "Easter" and the year "2011" at 2" using the Designer's Calendar cartridge. 6) Assemble page as shown.

Tuesday, March 15, 2011

Elegant Card Using Metal

Designer: Elizabeth Currie-Matsko

Tools and Supplies
Fuschia Colored Metal Sheet from local supply store
Cuddlebug
Embossing Folder
Embossing Ink
Embossing powder
Heat Tool
Stamp Sentiment
Cardstock
Handmade Fabric Flower

1) Cut cardstock and metal sheet to desired size. 2) Using Cuddlebug, dry emboss metal sheet with desired embossing folder. Adhere embossed metal sheet to card cover. 3) Adhere handmade fabric flower to center of card front. 4) Stamp sentiment on a piece of cardstock cut to the size of the sentiment and heat emboss. Adhere to front of card.