We have gotten such an overwhelming response to our first digital print edition! Thank you all so much for your patronage to our magazine!!
Since the response was so great -- 600 unique viewers to the magazine in the 8 days since it's been published -- we are committing to that format going forward. With this change in format (from blog posts to a published magazine), we will also be changing posting from weekly to monthly. This will help to facilitate getting what would be blog posts into the format necessary to publish it as a page-turning magazine.
Our first of the monthly editions will be published on August 15, 2011. Each month thereafter, a new monthly publication will be posted with new and fresh inspiration for your creations. You are sure to be blessed with some magnificent projects from the team of great crafters that submit for this magazine!!!
But wait... We will still do two bi-annual publications (January and July) that will be chock full of never-before-seen projects that have not been published to the monthly editions. And there's a special Christmas Edition that will be published on November 15th full of cards and crafts for the Christmas Holidays.
We are sure that you all will continue to enjoy the Village Scraps magazine in its new format! Thank you for allowing us to inspire you!
Much Love,
Dymonz and
The Scrap Dymonz Design Team
The Designer Dymonz Design Team

Tuesday, July 26, 2011
Monday, July 18, 2011
Inaugural "Print" Edition!
This the inaugural edition of the Village Scraps Magazine! This edition, and every "print" (or digital) edition will contain Bonus Projects -- projects that do not post weekly to the blog. There are also coupons and other information that will be contained. We hope you enjoy this first digital print edition!! To ensure that you continue to receive the magazine, please be sure you are a Follower of this blog. (Click on "Open Publication" to read the magazine in the viewer.)
Wednesday, July 6, 2011
Some Thoughts on the Dark Art Genre...
Dark Art – A personal view
As defined by Wikipedia
Primarily a product of the 20th Century, dark art is an art style defined as that being "dark" or unsettling in nature. Called and classified under many names such as gothic, horror, metaphysical, nightmarish, and disturbing, it is actually a culmination of techniques and styles. It has been presented in many forms by many artists, illustrators and film-makers. It continues to grow in popularity as a part of the horror genre and gothic, music and publishing culture. Today, it is a part of our mainstream culture, crossing over into multiple mediums including advertising, television, film, and marketing. While it has roots in horror, it has been presented as collage, surrealism, abstract, motion graphics, grunge, expressionism, and largely digital art.
Dark Art is, I think, is a personal voyage into the inner person. A journey into the unknown depths of that other side of the artist. The one untamed by convention and “normality”.
To teach, it is difficult, to learn it, harder. There are very few masters and most will only attain the status of acolyte. As with life, there will always be new avenues to explore, new techniques to try, a new emotion to deal with, helped along by others lucky enough to have drawing skills as well that have devised a new image to help us express these in an individually artistic way.
I can only speak for myself when I say that my true journey began with those images found at Tellen's Place Designs. They helped me develop that “unfettered by convention” freedom. Once that was nurtured and allowed to grow, my true journey began. Imagination is the only limiter. Let that soar and the results will follow.
Techniques learnt in mainstream art can be used, or is it the other way round? The darker side of art encourages the exploration of different techniques. Encourages mixing techniques that few have done before. The beauty of all this is – NOTHING is wrong. There is a place for glitter and glitz just as there is a place for the odd skull, witch or mystical image.
One thing Dark Art is not, and that's Cute.
Written and submitted by Helen Angel-Cullum (aka Croms)
Wednesday, June 29, 2011
Fourth of July Card
Designer: Croms aka Helen
In the words of Croms: "Not the easiest kind of card for me. I have no real idea what you guys do to celebrate your independence from us over here lol." Croms lives in Scotland, so this was not easy for her to do. Yet, look how beautifully she depicted this celebratory event! Enjoy!!


White Pearlised card stock base. All edges ink distressed with Barn Door Distress Ink.
Digi images from Tellen's Place Designs. Coloured with Promarkers.
Bald Headed Eagle taken from royalty free images on Google.
Papers all from stash.
The fold name is a *Tri Fold Shutter". To be found on Split Coast Stampers here. Just one I thought looked a bit like a flag.
Fourth of July Tag
Designer: TerryEO

Supplies:
Tellen's Place Designs Image
Georgia Pacific White Card Stock
Crystal Effects
Stickles: Diamond and Gold
Copic Markers
Recollections Foam Dots
Microsoft Gallery Clip Art
Brads from Stash
Red & Blue Card Stock from Stash
Red, White & Blue Ribbon from Stash
Fourth of July Projects by Designer Dymonz Kathy
ATC (Artist Trading Card)

Supplies:
Cardstock
Orgami Paper
Sassafras Stitch Border Stamp
SU! Kaleidacolor - Blue Frost
Nestability Heart Die Cut
Silver Stickles
K+Company - Americana Border
Cardstock
Orgami Paper
Sassafras Stitch Border Stamp
SU! Kaleidacolor - Blue Frost
Nestability Heart Die Cut
Silver Stickles
K+Company - Americana Border
Tag

Supplies:
Making Memories Alpha Stickers
Mrs. Grossman's Stars
Memento Ink - Lady Bug
Colorbox - Ice Blue
TH Distress Crackle Paint - Antique Linen
TH Tag Die
K+Company - Americana Border
EK Stickers
K+Company - Americana Border
Stickles - Silver
Making Memories Alpha Stickers
Mrs. Grossman's Stars
Memento Ink - Lady Bug
Colorbox - Ice Blue
TH Distress Crackle Paint - Antique Linen
TH Tag Die
K+Company - Americana Border
EK Stickers
K+Company - Americana Border
Stickles - Silver
Two Page Layout (12 x 12)

Supplies:
K+Company - Americana Border and Snow Globe
Cardstock
Stickles - Silver and Star Dust
Flowers
Oragami Paper
TH Dress Ink - Fired Brick
Copic Marker - R27
Die Cut Verbiage Boxes
TH Distress Sander
K+Company - Americana Border and Snow Globe
Cardstock
Stickles - Silver and Star Dust
Flowers
Oragami Paper
TH Dress Ink - Fired Brick
Copic Marker - R27
Die Cut Verbiage Boxes
TH Distress Sander
Tuesday, June 21, 2011
Toilet Tissue Roll Mini
Designer: TerryEO
The front of the mini is designed with flowers that have been ink distressed to match the paper; a butterfly gives a lovely presence with wedding accents. Fibers decorate the binder ring that holds the mini together.

The toilet tissue roll has become a popular base for mini albums these days. It is a refreshing way to recycle a product that is constantly used in all households. Here's a quick way to make your very own Toilet Tissue Mini Album.

You start with your standard toilet tissue roll by removing as much of the tissue as possible. Then you must flatten this roll. What I did was flatten them by hand and placed them under a very heavy object for a few days. This works quite well and remains flattened.

I decided to paint both sides of the roll since some of it will be showing once I adhered the paper onto it. You could use ink distressing on the edges as an alternative. Trim those little edges that tend to stick up.

I used doubles sided designer paper because it makes it easier to keep the flow of the design with the mini album. I did have to use my hot glue to reinforce the edges as the dry adhesive had trouble adhering to the painted surface.

This is the other side of those fabulous designer papers.

Now that your papers have been adhered to the roll, it is time to embellish each page. Keep in mind that it is a small space and creativity will be a lot of fun. On the left is a simple "library pocket" typical of a lot of mini albums. A small tag is insert for journaling. Liquid pearls were used to enhance a stamped image. On the right, scallop ovals were cut using left over paper where journaling can be used and a small picture inserted on top.

With the creative space being so small, you can leave room for photos and journaling and just add a few die cut pieces or bling in these spaces easily.

These small tags are inserted inside the toilet tissue roll easily and can be card stock or scrap paper from the ones used to make the pages. Flowers make easy toppers with a simple stamped image and ink distressing add a bit of fun to the tags.

On the left, a "folio" is easily added to give more room for photos, as well as the flip page on the right side, being held down by a button.

It's so much fun when these little treasures are opened to reveal more in this little mini.

Typically, the last page is kept blank but a simple chipboard frame with scrap paper from the pages add a space for yet another photo in this mini. The tags compliment the pages as well.
A very simple project that is filled with a luscious crafting presence.
Supplies Used
K & Company Designer Paper
K & Company Die Cuts
Recollections Butterfly
Recollections Flowers
Recollections Pearl Brads
Prima Flowers
Recollections Rhinestones
Liquid Pearls
Stickles
Martha Stewart Scallop Oval
Button from Stash
All About "Digis" -- Digital Stamp Images
According to Wikipedia, “A digital image is a numeric representation (normally binary) of a two-dimensional image. Depending on whether or not the image resolution is fixed, it may be of vector or raster type. Without qualifications, the term "digital image" usually refers to raster images also called bitmap images.”
Early digital fax machines preceded digital cameras and computers by decades. The first picture to be scanned, stored, and recreated in digital pixels was displayed at NIST (National Institute of Standards and Technology). The advancement of digital imagery continued in the early 1960s. Digital images come in several types of formats such as JPEG (Joint Photographic Experts Group), TIFF (Tagged Image File format), PNG (Portable Networks Graphics), GIF (Graphics Interchange Format) and BMP (Windows Bitmap) to name a few.
Today, you can easily find digital images in the thousands. The scrapbooking world is inundated with digital imagery whether scanned from a stamped image, drawn using computer software or scanned in from an artist using pen and paper. These images are becoming more and more popular with the use of the computer and printer, enabling the everyday crafter to use these images in all types of crafting projects.
Today, you can easily find digital images in the thousands. The scrapbooking world is inundated with digital imagery whether scanned from a stamped image, drawn using computer software or scanned in from an artist using pen and paper. These images are becoming more and more popular with the use of the computer and printer, enabling the everyday crafter to use these images in all types of crafting projects.
Using a typical word processing software, digital images can be inserted into Word documents, resized and, if using a photo type software such as Photoshop, these images can be colored. Many find digital papers designed for use in place of the standard designer papers purchased in craft stores to be easily accessible. The fact that digis can be resized to the exact parameters of the project affords efficient paper use and is less wasteful. On the other side of that same coin is the amount of ink cartridges used for printing those fabulous digital designs -- some find this to be a bit costly.
This standard way of using digital images has brought a wide array of “stamping” to the crafting world. It is a fine addition to the regular stamping technique that has been the standard in today’s scrapbooking but it is making headway and in time could be the way to go for people who have little storage space. Another feat in the world of technology!
This standard way of using digital images has brought a wide array of “stamping” to the crafting world. It is a fine addition to the regular stamping technique that has been the standard in today’s scrapbooking but it is making headway and in time could be the way to go for people who have little storage space. Another feat in the world of technology!
Article written by TerryEO
Father's Day Card with Digi
Designer: TerryEO


Supplies Used
K & Company Patterned Paper
Stampin' Up! Cardstock
Wild Orchid Roses
The Robin's Eggs' Dew Drops
Tellen's Place Designs Digital Image
Top Note cut with Big Shot
Letters cut with Cricut
Father's Day Card
Designer: Helen aka Croms

The octagon shapes and letters are cut with dies.
The octagons are white corrogated card. After cutting, they were lightly inked brown then triple embossed with orange embossing powder. The metal looking splotches are the addition of dark blue powder and some gold was sprinkled on before reheating again.
The letters were cut from yellow cardstock and forest green distress ink pad pressed on to give a mottled look. The 4 is a gold peel off under a gel tag to change the colour slightly. All attached using a silicon glue substitute (pinflair - no odor). Some dark grey linen look cardstock was embossed and some areas were picked out with glossy accents. Twine added (from stash) and all adhered to terracotta card base. Edged with copper peel offs.
Wednesday, June 8, 2011

Card With Ink Distressing


Designer: Helen Angel-Cullum
I had a whole lot of fun with this.
A close up of the shimmer paint used on the fire, bubbles and book.
The image is from the Fantasy range at Tanda Stamps. Stamped with Stazon onto watercolor paper. Colored in using distress inks. The background ink of Antique Linen Distress Ink was painted around the image then extra applied to the torn edges and in towards the image. Black Soot was then applied on top. This was layered onto some vellum pre-printed with olde script and then onto a handmade paper layer. All adhesive at this point is under the main image.
The handmade paper was "painted" with water along the lines to be torn and pulled apart to give the impression of fabric. When dry, was stamped with black distress ink with a grid pattern before applying more black DI to the edges.
The bottom layer is more olde looking vellum, attached with brads to a paper base after distressing the edges with sandpaper. The image panel was then secured with more brads. The sentiment is peel-off lettering colored black with promarker.
The whole thing is then attached to a dark grey linen-look card base that has also had "the sandpaper treatment" and lightly distressed with more black distress ink to highlight the texture.
Supplies
Wizard image - Tanda Stamps
Grid pattern stamp - Molly Blooms
Distress Inks - Barn Door, Black Soot, Antique Linen, Bundled Sage, Forest Moss, Mustard Seed.
Shimmer paint
Papers, vellum, brads, peel-off letters, card stock from stash
Tuesday, May 31, 2011
Altered Picture Frame
Designer: Helen Angel-Cullum
Well I have a few old frames that I saved from the bin and this project got me to actually use one. I also incorporated a picture that I made some time last year and never framed. I don't have access to a craft shop around here for a new alterable frame, but isn't that what crafting is all about? Using things around the house as well?
went from
 to
to
using tissue paper and pva glue.
Pitchblack, Aubergine, Pesto and Cranberry alcohol inks daubed on and metalic rub on paste on the outside
chip board cut to size. Painted with gesso then grey acrylic paint. Stamps from Smeared Ink and Cherry Pie stamped with Stazon.
The black roses were made using 2 different types of black paper. Glued on using pinflair glue (like a silicon but no smell).

All this to showcase one of the best love poems ever written (in my eyes anyway).
Card Basics
When I first began making cards, I did not have much to get started except designer paper. I needed a lot more than that but didn't really know how to get started. I did buy a magazine that had a number of different cards but they varied so much, it was difficult where to get started. For those of you who want to get started in the card making arena, it is really simple.

It's easy to limit supplies to this list:
*White Card Stock (card base)
*Stampin Up! Border Punch
*Stampin Up! Scallop Punch
*Stampin Up! Snail Adhesive
*Stampin Up! Stamp
*Stampin Up! Designer Paper
*Stampin Up! Card Stock
*Offray Ribbon
*Recollections Rhinestones
*Foam Dots
The white card stock will serve as your base. Having designer paper gives your card a scene that would highlight your stamped image. Stampin' Up! designer paper is reversible which gives you more paper to design around. The scalloped card stock would serve as a background for the stamped image, giving it a spotlight so to speak. Ribbon and rhinestones make the perfect embellishments to add flare to your card. The foam dots will give your image a 3D effect.
This is a simple way to get started in card making without making it an expensive hobby. Keep it simple and have fun!
Written and Submitted by TerryO
SU! Circle Scissor Plus Tool
If you're like me, you need circles in your projects of varying different sizes. One day while in the LSS, I went on a mad hunt for different sized circle punches. I was always needing one circle for a project and it would be just the size I didn't have in a punch. That meant pulling out the Cricut, loading up the mat, finding George and Basic Shapes cartridge, finding the circle on the cartridge, sizing it and cutting it. That's an awful lot of steps when you just need one circle...
I also realized that I had so many circle punches in my cart it was ridiculous! From the 1/2 inch circle up to a 3.5 inch circle that's what I had in my shopping cart. Needless to say, when I did my cart tally before heading to the register, I realized I was spending too much money in punches. Besides, where the heck was I going to neatly and accessibly store all of those punches??? Then I remember about the Circle Scissor Plus from SU! Promptly putting the punches back and checking out, I headed home to order my new tool from SU!

Stampin' Up! Circle Scissor Plus
112530
The Circle Scissor Plus cuts circles from 1 inch up to 6 inches and every increment in between. This nifty little tool is quick and easy. It comes with a cutting blade as well as a drawing blade -- you can also draw circles (without cutting them out)! This will come in really handy when I want to draw attention to something in my design or on a picture. I can use this tool to draw a neat and even circle around the item! And it's quick and easy too -- just place your paper on the cutting mat, select the proper size using the dial, place the cutting base over the paper, insert the cutting blade and turn. No sticking paper to mats, loading/unloading, searching through carts for the right circle, or waiting while the machine cuts. You're done cutting in less than 10 seconds!
This is a great tool to have in your arsenal. I will be creating a circle journal in the near future and the Circle Scissor Plus is going to make that project infinitely easier! Just remember, for the smoothest cut it's best to use this tool with a glass mat. I use the SU! Glass Mat (112531), which made the cutting smooth and easy. The glass mat provides a 13 x 13 surface area for cutting. Attempting to use the Circle Scissor Plus on a self-healing mat may yield uneven or jagged cutting results. This little tool will certainly be well used!
Much love,
Dymonz...
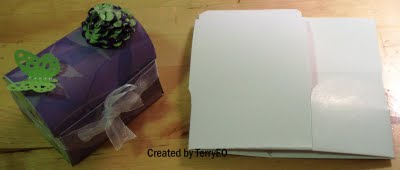
Altered Tickler File Box
I purchased this plain white box to alter in order to create a tickler file to organize the ATC and Tag Swaps at the Village. It is a Creative Imagintations be. (bare elements) box designed to be decorated to your liking.
Designer: Sumaiyah Yates

Front View

Inside View

Top View

Box with Index Dividers
Tools and Supplies
Creative Imaginations: be. bare elements Box
SU! Designer Series Paper - Springtime Vintage (121782)
Four strips of ribbon - 4.5" long
SU! Baja Breeze Grosgrain Ribbon (111847) - two strips 26" long
SU! Ballet Blue Classic Stampin' Pad (100907)
3 Brads
Spellbinders Nestabilities Scalloped Circles - 2 different sizes
TH Tags and Bookplates Die
Vagabond Machine
Adhesive
Hot Glue Gun
Charms
Have you ever considered unique items that can be used on your projects? Charms are great items for paper projects and can be handmade along with the papercraft for an extra special touch.


Designer: Terry Oulboub


Using Glossy Accents
There are a few products out there in the market very similar to Ranger's Glossy Accents eg Judikins Diamond Glaze and Stampin' Up!'s Crystal Effects. They all have similar applications and every crafter will have a preference. It is a clear, three-dimensional gloss medium that can be used on a number of different materials. It can be used to accent, brighten, dimensionalize and magnify distinct areas. It's acid free, non-toxic and dries to a hard, clear finish. This makes it ideal for all crafts.
Glossy Accents is best used on small areas on paper and card or the moisture in it will cause warping. Also it can cause some inks to bleed, so care should be taken. Do a test when trying it on a new colouring medium -- I know it makes my printer ink bleed, even after heatsetting. You don't want to spend time colouring in an image and then ruin it with some over zealous application of the glossy accents!
It can also be used as a glue in small areas. This is ideal for attaching a small pic to those clear acrylic fragments that TH supplies or gems to artwork. Try mixing in glitter and using to give even more sparkle with no fear of glitter shedding when rubbed. Or add alcohol ink to change the colour slightly and emphasize those areas even more.
Ranger also make a Crackle Accents. Very similar to the Glossy Accents in appearance but a bit thicker. This, when dried, gives a great crackle effect that can also be high-lighted after thoroughly dry with ink rubbed into the cracks. Also in this family by Ranger is the Matte Accents. This, as the name suggests, gives a clear matte instead of glossy finish giving a subtle, dry embossed look to the artwork. And there is also Sepia Accents, which as the name suggests gives a sepia-tone dimensional finish, and Enamel Accents which is an opaque dimensional accent that gives the look of enamel when dried.
Each product has it's own niche, and depending on the type of artwork being crafted, one or more of these mediums are strong contenders for the "Craft Room Essentials" list.
Written and Submitted by Helen Angel-Cullum (aka Croms)
Thursday, May 19, 2011
Sidestep Card
Designer: TerryEO


Tools and Supplies
DCWV Shimmer Stack Card Stock
K&Company Die Cuts
K&Company Patterned Paper
Stampin' Up! Window Punch
Stampin' Up! Oval Scallop Punch
Stampin' Up! Card Stock
Foam Dots
K&Company Die Cuts
K&Company Patterned Paper
Stampin' Up! Window Punch
Stampin' Up! Oval Scallop Punch
Stampin' Up! Card Stock
Foam Dots
Artist Trading Card (ATC)
Designer: Vernetta

Tools and Supplies
Watercolor Paper
VersaMark Stamp Pad
Heat Tool
Copper Metallic Zing Embossing Powder
Yasutomo Shimmer Watercolor Paints
Tuesday, May 10, 2011
Altered Treasure Chest
Designer: TerryEO
From plain to fab

Front View

Side View

Matching Match Boxes
Tools and Supplies
K&Company designer paper (Susan Winget collection)
Martha Stewart Embossed Butterfly Punch
Martha Stewart Crystal Fine Glitter
Plain Boxes (Oriental Trading)
Stampin' Up! Card Stock
Recollections Flat Back Pearls
Martha Stewart Embossed Butterfly Punch
Martha Stewart Crystal Fine Glitter
Plain Boxes (Oriental Trading)
Stampin' Up! Card Stock
Recollections Flat Back Pearls
DT Member Spotlight: Joyce Lofton

Joyce
Joyce, also known as Joynana, joined the Designer Dymonz on May 1, 2011. Joyce has been scrapbooking since 2005 and making cards for about 1 1/2 years, and she got into blogging a couple of months later. Joyce has a love digital images because there are no storage concerns -- she can have as many as she can store on her computer! However, being able to resize them to use on any size project is the main draw. Joyce is a Copic junkie like many of us, although she was not impressed with them or making cards when on first trying them out. She later found that she had to have more and more -- the Copic bug had struck! Joyce now is the proud owner of about 175 Copic markers and craves more, along with the desire to become a Copic Certified Designer. She does admit that she sometimes also uses Prismacolor pencils. A 57 year old mother of 2 and grandmother of 4 -- all girls -- living in Alabama and working full-time, Joyce doesn't have as much time for crafting as she would like. Included in her other hobbies are photography and genealogy. This is Joyce's second design team position and she is glad to be here. Look for her inspiring cards and other creations in the coming months!
Joyce's blog can be found here, and she is one of the Co-Moderators of the Card Making Group at the Village.
Creative Crafts -- Stick Pins
Designer: TerryEO


Tools and Supplies
DCWV Card Stock
Jewelry Gallery Beads
Pizzazz Aplenty Stick Pins
Pizzazz Aplenty Flatback Pearls
Martha Stewart Border Punch
Up & Up Cosmetic Sponges
AdTech Low Temp Glue Gun
Feathers from Stash
Organza Ribbon from Stash
Jewelry Gallery Beads
Pizzazz Aplenty Stick Pins
Pizzazz Aplenty Flatback Pearls
Martha Stewart Border Punch
Up & Up Cosmetic Sponges
AdTech Low Temp Glue Gun
Feathers from Stash
Organza Ribbon from Stash
Tuesday, April 26, 2011
Pre-Mother's Day Mini Album
Designer: TerryO


Tools & Supplies
Chipboard
K&Company Designer Paper "" Collection
K&Company Die Cuts
Martha Stewart Border Punch
Ranger "Diamond" Stickles
Twinklet's "Diamond Dust"
Michael's Butterflies (cover)
Recollections Butterflies
Recollections Flowers
Handmade Flowers
Tule
Ribbon/Gems (from stash)
Subscribe to:
Posts (Atom)